Your public booking page
The page clients use to book themselves in: the four steps, multi-service selection, available times, and how to customise it.
Your public booking page is the URL you share with clients. It's the single most important thing on TimeToBook: it's how you actually take bookings without picking up the phone.
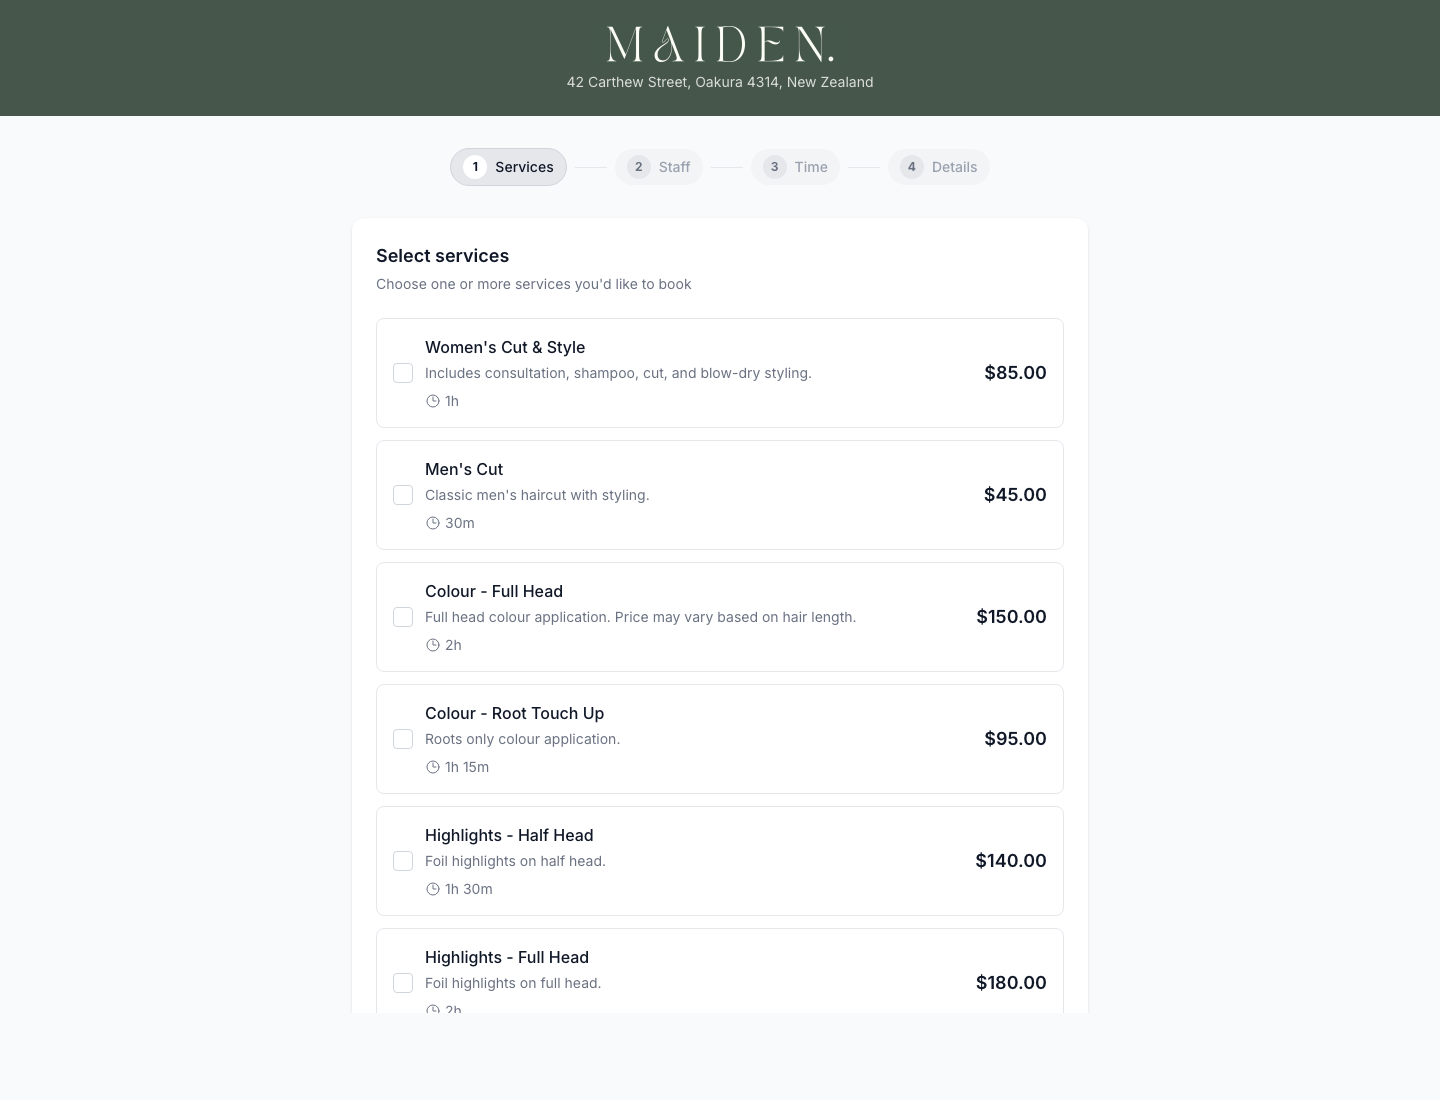
The four steps
The booking page walks clients through four steps in order:
- Services: pick one or more services.
- Staff: pick a specific stylist or "first available".
- Time: pick a date and time from the available slots.
- Details: name, email, phone, and confirm.
That's it. Clients don't need an account or a password.
Step 1: Services
Clients see every active service for your location, with its client-facing duration and price. Each service is a tappable row with a checkbox, and clients can select one or more services in a single booking.
When multiple services are selected:
- The total duration updates in real time.
- Step 2 only shows staff who can perform all of the selected services.
- Step 3 books the services back-to-back as a sequential chain.
Step 2: Staff
Clients see the staff who can perform their selected services, each with a photo (if uploaded) and title. They can also pick "First available", the fastest route to a booking if they're not fussy.
Staff with different price tiers show their own prices on this step, so clients aren't surprised later.
Step 3: Time
Clients pick a date, and the page shows available start times for the full service chain. Slots are calculated live from the staff member's working hours, existing bookings, and the total duration needed.
Start times are offered every 15 minutes (9:00, 9:15, 9:30 and so on), whatever the length of the service, as long as the whole appointment fits. This interval can't be changed. Your Minimum notice required and Maximum days in advance settings under Settings → Booking Page also limit which times show.
Slots inside another booking's processing time are fair game. If Emma has a colour with 45 minutes of developing time starting at 10:00, a client picking a 30-minute service will still see 10:30 as a bookable slot, because Emma's hands are free during that window. This is invisible to the client; they just see an available time.
Step 4: Details
Name, email and phone are required, and there's an optional note. We look up existing clients by email or phone to avoid creating duplicates. After they confirm:
- A confirmation email goes out immediately, with a Manage Your Booking button they can use to view or cancel.
- The booking lands on your calendar in real time.
- Reminders go out before the appointment at the times you've set under Reminders in Settings → Notifications. New locations start with one email reminder 1 day before.
SMS confirmations and reminders are off by default. Turn them on in Settings → Notifications; they need SMS credits. If you've turned on New Booking Alert, you also get an email at your location's email address. See Messages, email and SMS for the full list.
Customising the look
Your booking page uses your location's branding. The top of the page shows your logo if you've uploaded one, or your location name if you haven't (not both). Your address sits underneath. To update it:
- Go to Settings → Booking Page.
- Under Branding, click Upload logo (PNG, JPG or SVG, max 2MB). Wide or square logos work best.
- Pick a Primary Color that matches your brand. It's used for the header, buttons and accents.
- Click Save Settings.
The change is live on your booking page immediately.
Showing or hiding your address
Under Address Visibility in Settings → Booking Page, choose how much of your address appears on your booking page:
- Full address
- General area only (city and region)
- Don't show an address
Handy if you work from home. Clients always get your full address in their booking confirmation, so only people who book can see exactly where you are. The address itself is set in Location Details.
Adding a notice
Need to tell clients something before they book? Maybe you're closed for the holidays, or running a special offer. You can add a notice that appears at the top of your booking page:
- Go to Settings → Booking Page.
- Type your message in the Booking Page Notice field.
- Click Save Settings.
Leave the field empty to hide the notice. Line breaks are preserved, so you can format the message over multiple lines.
Previewing as a client
Before you share your URL publicly, walk through it yourself to see exactly what your clients will see. The booking page is public, so you don't need to log out, just open your URL in a new tab (or a private window) and tap through it like a client would.
Your URL is on the Dashboard under Booking URL, and at the top of Settings → Booking Page with a Preview link. You can even complete a test booking using your own name and email. It'll land on your calendar like any other booking, and you can delete it afterwards. This is the fastest way to sanity-check services, pricing, staff availability, and branding before going live.
If your booking page is currently toggled off (under Settings → Booking Page), turn it on before previewing. Otherwise visitors, including you, will see the "temporarily unavailable" message.
Sharing your booking URL
Your URL looks like https://timetobook.com/book/your-slug (or your region's domain, such as timetobook.co.nz). Copy the exact link from your Dashboard. Where to put it:
- Instagram bio: the single most effective place.
- Google Business Profile: under "Appointments" or "Website".
- SMS signature: if you still get phone enquiries.
- Your website: a single "Book now" button.
- TikTok bio: if that's where your clients are.
Closing the page
Need to pause online bookings temporarily? Go to Settings → Booking Page and switch off Enable booking page. Clients visiting the URL will see a "temporarily unavailable" message.
Still stuck?
Our support team is ready to help.